Showing posts with label Wedding Hairstyle. Show all posts

Wednesday, April 24, 2013

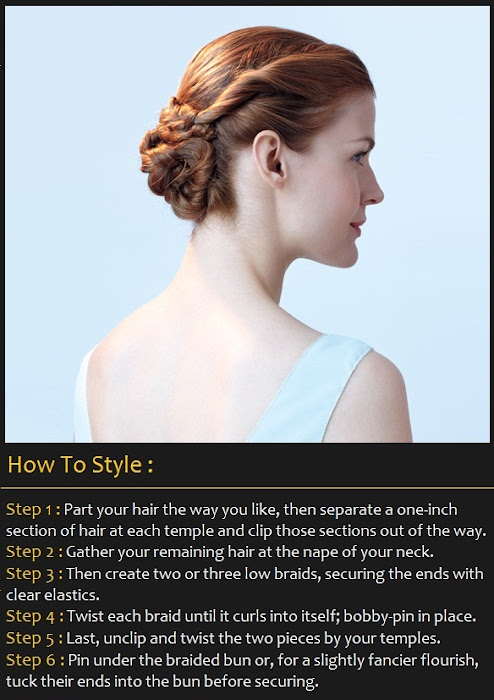
How To Style a Flower Bun Hairstyle

How To Style a Flower Bun Hairstyle
How To :
- Part your hair the way you like, then separate a one-inch section of hair at each temple and clip those sections out of the way.
- Gather your remaining hair at the nape of your neck.
- Then create two or three low braids, securing the ends with clear elastics.
- Twist each braid until it curls into itself; bobby-pin in place.
- Last, unclip and twist the two pieces by your temples.
- Pin under the braided bun or, for a slightly fancier flourish, tuck their ends into the bun before securing.

    Source : 6 Easy Braided Hair Looks
    Tutorials You Should also see :

    Wednesday, April 3, 2013

    How To Make Hairstyle With Chopstick

    How To Make Hairstyle With Chopstick
    How To Make Hairstyle With Chopstick

    Tutorials You Should also see :

    Saturday, March 30, 2013

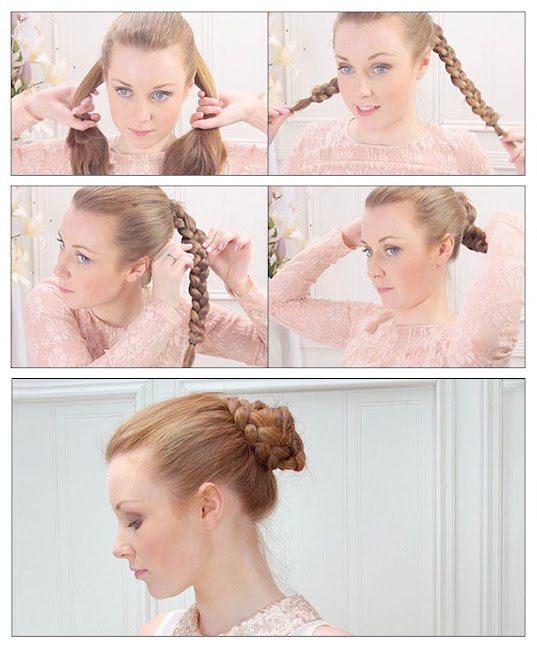
    How To Make Braided Bun Prom Hairstyle

    How To Make Braided Bun Prom Hairstyle
    How To Style :
    • Step 1 : Brush through the whole of your hair using your hair brush. Then use your styling comb to backcomb the top section of your hair, Smooth over using your hair brush and tie back into a high ponytail.
    • Step 2 : Now it’s time to split the ponytail into two separate sections to start your prom hairstyle, making sure they are equal in size. Tie one section of the hair with a thin hair band to keep it out of the way.
    • Step 3 : Braid right down to the ends of the hair section and secure with a thin hair band. Repeat this step with the other section of hair.
    • Step 4 : Now you need to criss-cross the braids, so take the right braid under the left braid and wrap around the base of the bun as far as you can go, then secure in place with a bobby pin.
    • Step 5 : Now take the left braid and wrap it around the base of the bun, starting from the right side. Secure in place with a bobby pin, repeating the above step, Finish off by spritzing some hairspray all over to hold in place.
    Source : bobbyglam.com
    Tutorials You Should also see :

    Thursday, March 28, 2013

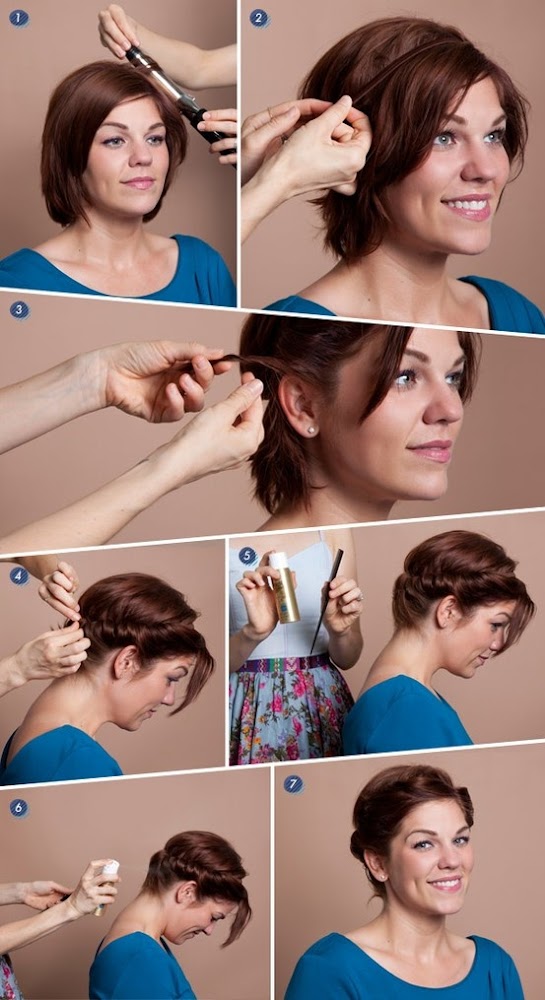
    Quick romantic hairstyle for short hair

    Quick romantic hairstyle for short hair
    Steps : 
    Step 1. Using your curling iron, curl all over, being sure to direct the curls away from your face. Spritz with hairspray.
    Step 2. Determine the placement of your headband and slip it over the crown of your head, pin into place.
    Step 3. Starting from the front section, begin twisting and tucking sections of hair up and over the headband, it should start resembling a crown.
    Step 4. Continue twisting and tucking, being sure to fill in any gaps.
    Step 5. If you have very short hair in the back, use your comb to hold the hair in place while you blast with hairspray.
    Step 6. Set the style with hairspray.

    Tutorials You Should also see :
    Saturday, March 16, 2013

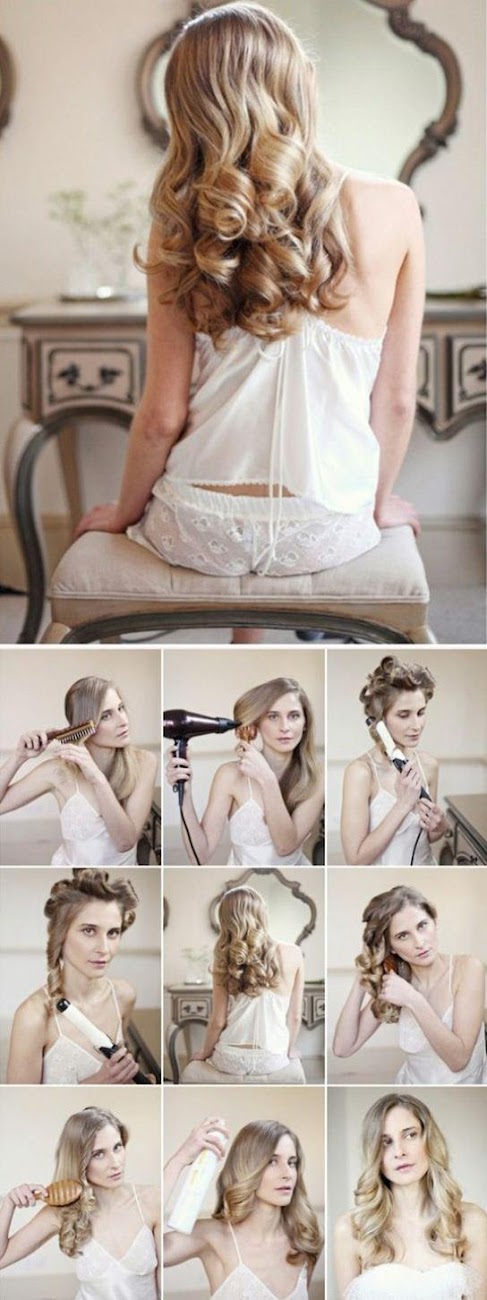
    Make a Romantic Waves Bridal For Your Hair

    How To Make a Romantic Waves Bridal For Your Hair
    How To Make a Romantic Waves Bridal For Your Hair

    Tutorials You Should also see :
    Monday, March 11, 2013

    How To Make a Chignon Bun

    How To Make a Chignon Bun
    Steps :
    1 : Gather all of your hair in one hand.
    2 : Start twisting all of your hair in your hand around 1-2 fingers. Hold your starting point in your other hand as if it were a hair tie (if you have hair that is thick and slippery you may just want to put a hair tie in.
    3 : Continue to wrap your twisted pony around your starting point until you reach the end of the pony, continually twisting your finger at the same time to keep the ponytail tight.
    4 : Secure the end of your pony with a bobby pin, making sure that it goes as far in towards the center of the bun as possible.
    5 : Add extra bobby pins to ensure that the bun will stay in place. I usually use about 3-4, if you have thicker hair or many layers, you may have to use more.
    6 : Toussle your hair slightly to give it a 'messy, effortless' look and sprits it a few more times with some hairspray or styling product if needed.

    Source : My Non-Do, Hair-Do

    Tutorials You Should also see :

    Wednesday, March 6, 2013

    How To Make Retro Updo Fishtail

    How To Make Retro Updo Fishtail
    How To Make Retro Updo Fishtail
    Source : Fishtail

    hair care products for women


    Tutorials You Should also see :

    Sunday, March 3, 2013

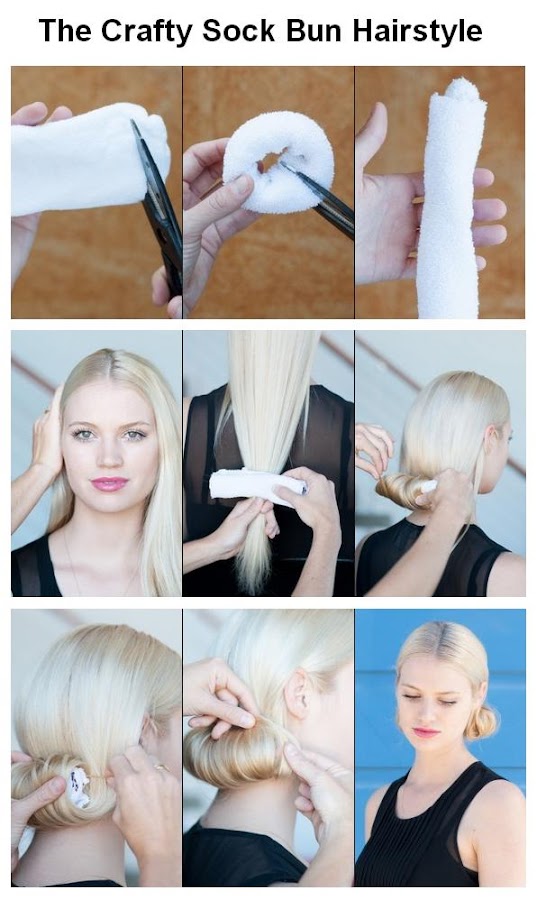
    The Crafty Sock Bun Hairstyle

    The Crafty Sock Bun Hairstyle
    How To Style :
    • Step 1 : Cut the toe off of the sock.
    • Step 2 : Roll it over itself to create a donut shape.
    • Step 3 : Cut the donut shape so it becomes a long roll.
    • Step 4 : Trim the ends so the roll is the length of the base of your head.
    • Step 5 : Part your hair in the middle. Spread a dime-sized amount of smoothing serum over your hair to get rid of any flyaways.
    • Step 6 : Place the sock roll horizontally, a few inches from the bottom of the hair.
    • Step 7 : Wrap the ends of the hair over the sock and continue to roll up until you get to the base of the neck, adding any loose hair as you go.
    • Step 8 : Hold the roll in place and secure with bobby pins on each side and above the roll. Don’t skimp — you’ll need a bunch to keep the style in place!
    • Step 9 : Fan the hair around the sock to conceal and secure with more bobby pins.
    • Step 10 : And bam
    Source : 4 Easy & Unexpected DIY 'Dos

    Tutorials You Should also see :
    3 Steps To Easy Breezy Beach Waves
    how to make hair chalking on dark hair
    beautiful Side braid
    How to make Double Side Braid For Hair
    Make a beautiful braid for your hair

    Saturday, March 2, 2013

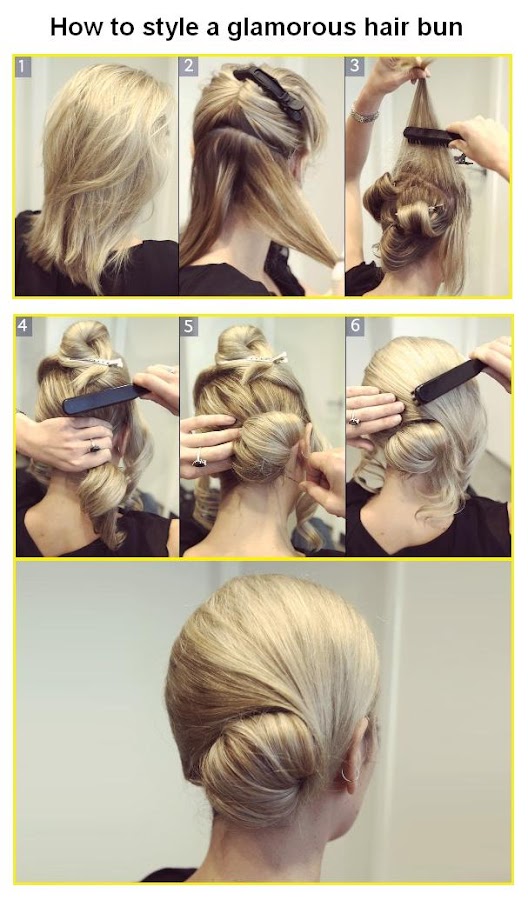
    How to Make a glamorous hair bun

    How to Make a glamorous hair bun
    How to Make a glamorous hair bun

    Source : Glamorous Bun

    Tutorials You Should also see :
    3 Steps To Easy Breezy Beach Waves
    how to make hair chalking on dark hair
    beautiful Side braid
    How to make Double Side Braid For Hair
    Make a beautiful braid for your hair

    Tuesday, February 19, 2013

    12 Beautiful Chignon Hairstyles

    12 Beautiful Chignon Hairstyles for wedding


    Tutorials You Should also see :

    Sunday, February 17, 2013

    How to make a Messy French Roll

    How to make a Messy French Roll
    Source : Tutorial: How do you do that hair-do you do ;)


    Tutorials You Should also see :

    Saturday, December 1, 2012

    Make a Diy Wedding Hair

    How to Style:
    1. This first look starts with a ponytail at the back of the head, leaving out some hair from the sides and back.
    2. Reach through the top of the base of the ponytail, grab the ends and pull it through to create the topsy tail.
    3. Make two smaller ponytails below and to the side of the first, including the hair from the first ponytail, but still leaving a bit out at the nape.
    4. Topsy tail them!
    5. Then make a ponytail with the remainder of the hair at the nape, and topsy tail it.
    6. Tuck the ends of the final ponytail under and gently pin them into place.
    7. Loosen up the look by gently pulling it apart a bit. Secure with hairspray and add a flower or jewel to garnish if you wish.

    Tutorials You Should also see :
    How to Make a Hair Bun for Your Wedding

    How to Make a Hair Bun for Your Wedding


    Steps:
    Step 1: If your hair is straight, use a 1″ curling iron to curl everything under. This will make it easier to tuck pieces into the bun. When they’re straight, they tend to pop out more. If you have wave or curl you can skip this step if you want to.
    Step 2: Flip your hair over and gather everything into a ponytail on top of you head, securing it with an elastic ponytail holder.
    Step 3: On the last time around with the ponytail holder, only pull the ponytail through half way.
    Step 4: Take the loop you’ve created and spread it out. Don’t over think it. Just widen it and allow it to be somewhat messy.
    Step 5: Take the tail end and wrap it around the ponytail base.
    Step 6: Pin the end of the ponytail to the base using a couple of hair pins/bobby pins.
    Step 7: Gently pull on pieces and then pin them. This will give your top-knot a slightly more messy texture.
    Step 8: Spray a veil of medium hold hairspray all over. Don’t smooth down all of the fly aways, just lightly tuck the pieces that have gone rogue!
    Tutorials You Should also see :

    Saturday, November 24, 2012

    Make A Wedding Hairstyles for Long Hair

    How To Style :
    • Step 1 : Starting at the root, begin to curl hair, twisting the hair, and adding more until the entire iron is covered with hair.
    • Step 2 : Gather the curled section and pin with metal clip.
    • Step 3 : Continue to do this to the bottom section, moving up through the entire head, until the head is completely set. curl the front away from the face, to achieve a softer, modern look.
    • Step 4 : Let hair set for 20 minutes, spray lightly with hair spray.
    • Step 5 : Start releasing the hair from the bottom up, keeping the curl intact as you go and spray hair, lightly, after all the curls have been released.
    • Step 6 : Gently, with your fingers, pull through the end of the hair to soften and release the curl. and you are done!
    Tutorials You Should also see :

    Thursday, November 8, 2012

    Wedding Hairstyle Inspiration

    Wedding Hairstyle Inspiration

    //PART 2